Since we already know how to use modules or libraries in Python3, we can create our own. Actually, this is very simple because you can import any file that contains Python code as a module. The only thing that you need to be aware of is the name of your file: It may not contain any blank spaces.
Since it is so basic, we can start away with practicing. Remember our typical example of the temperature conversion? We already created a function that can do this for us in lesson 8 so what we want to do now is import it and use it in a new file.
Two hints:
If you have forgotten how to import modules, you can go back to the last lesson.
If you get some seemingly strange output, go back to the file you imported. If you print something in this file you imported, it will also be printed in your new file, thus adding some unforeseen output.
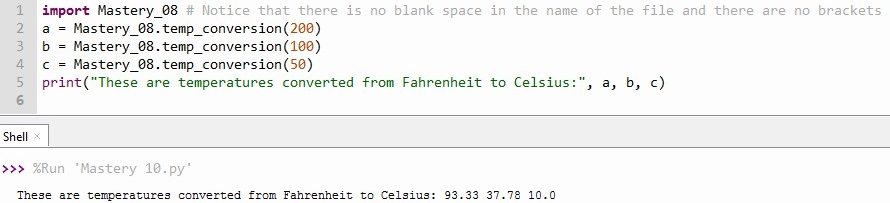
Your result may look like this:
Finally, you should also consider
that Python does not re-read a file if you have already imported it. So if you make
changes in a file and want to use it imported in another one, you have to
restart the execution, i.e. just run the program again.
Like in some previous lessons, I recommend looking at Think Python by Allen B. Downey for more detailed information. It was also the inspiration for this post.
Congratulations! You have already completed 10 lessons! #mastery10
In the previous lessons, we learnt how to use functions and how to create them. In Python, you also have the possibility to use functions that other people have created already. Just importing these modules or libraries, as they are called, might save you lots of time. So before you start writing a complicated function, you search on the Internet. It is very likely that you are going to find something.
Once you
found the name of the library, you just write “import “ (one blank space)
and then the name of the module or library you want to import. When wanting
to access a particular function, you write the name of the library followed
by a point and then the name of the function.
If you want
to generate random integers between 1 and 100, you can import the random
library and use its function randInt(). Your code might look like this:
What
function would you like to have? See if you can find it on the Internet. #mastery09
Knowing how functions work, we are now going to create one on our own. Maybe you remember that in a previous exercise, we converted temperatures from Fahrenheit into Celsius and rounded the result to two decimals.
Imagine you would need to do this many, many times so you would want to find a way to automate it. You could create a function.
There are 6 steps to create a function:
Let Python know you are going to define a function by writing def.
Give your function a name (to call it later on) and write it behind def (one blank space in between). In our example, I call my function temp_conversion. The rules for naming functions are the same as for variables: the first character can’t be a number; it cannot be a keyword (a word that is already defined in Python). A function should also not have the same name as a variable.
Define the argument. Write two brackets (directly after the name) and put the names of the variable(s) you want to have as argument(s) inside. If you have more than one, you need to separate it by commas (and a blank space after it). You can also leave it blank. temp_conversion only has one argument, the temperature in degrees Fahrenheit represented by the variable F.
Finish the so-called header (first line of a function) by writing a colon after the final bracket of the argument.
The rest of the function, called the body, has to be indented. Then you can define the steps you want your function to implement. My new function temp_conversion should define the temperature in degrees Celsius using a variable C and the conversion formula (I just copied it from the conversion we did before). Afterwards, it should round it to two decimals (again, just copied from before).
At the end, you need to define what your function is supposed to return by writing it inside the brackets of the return function. In the example, I just put C.
Now that we
have defined the function, we can call it. Remember that we do this by just
writing the name with values for the arguments in brackets. Here, I put 200 as
the value for F.
Don’t worry
if you still see no result in the console. As always, you need to print the
function or a variable to which you have assigned the return value of your
function in order to see any results.
One final piece of advice: The function only works as long as you do not create another function with the same name. As Python can only remember one function per name, it will just use the one most recently executed and forget the other one. You should be able to avoid this by giving meaningful names to your functions. However, what is useful to know is that Python does not consider the names to be identical if the functions have different numbers of arguments, i.e. you can have multiple functions with the same name as long as they have a different number of arguments.
Like some previous posts, this one was inspired by Think Python by Allen B. Downey. If you want a more complete approach to learning Python (including all the theory), you can have a look at the free pdf version.
If you’re completely new to programming, you might not understand the heading: What is “calling functions” supposed to mean? Actually, “calling” is just a technical term for “using“ here. You can think of the existing functions as being dormant somewhere in the memory of the program or in a library. If you want to use them, you need to call them so they appear.
In fact, this lesson is basically just a revision with a more detailed look on a topic you already know, like the previous ones on output and user input. We have used several functions before, for instance print(), input() or type(), but this time we are going to focus on the terminology.
When we refer to functions, we say their name, for example print, input or type. Be aware that capital letters matter and change the name.
You probably remember from my way of writing functions that they are followed by brackets. What is inside, is called the argument. Depending on the function, it can be one or several variables.
What do functions do? Functions take an argument, implement a series of operations and return a result. This is why the result is also called return value.
Time to practice: Use at least 5 functions in Thonny and indicate the name, argument(s) and return value in comments. Hint: I’ve already mentioned three functions above and in the post on data types, you can find some more.
Be aware that only the function print() generates an output, i.e. you can see the return value when you execute the program. For all the other functions, you need to assign them to a variable and then print it in order to see the return value in the console.
Having looked in more detail at output, we are going to focus on user input this time. Basically, it is a revision of what we have applied in previous lessons already.
If you want
the user to assign a value to a variable, you have to write
the name of the variable
the symbol for assigning a value to it (=)
the function input()
You could
leave the brackets of the input function empty, but this way, the user would
not know what to enter. It makes more sense to write an instruction to let the
user know what should be entered. Remember that when writing text, the data
type is character or string and needs to be inside quotation marks “”.
When following this instruction, Python will consider the input to be a string. This means, that you cannot do any mathematical calculations with it even if the user enters numbers. If you do not want the data type to be string, you need to let Python know what data type you want using the functions for data type. For this, you have to change step 3 of the previous instruction: Instead, you write the data type’s function first, for example int() for integer, and then you put the input function inside the brackets of the data type’s function.
Now it’s
time to practice:
Write a program that will prompt the user for a temperature in Fahrenheit and then convert it to Celsius. You may recall that the formula is C = 5 ∗ (F − 32)/9. Make sure that the resulting temperature is rounded to two decimals (Hint: Remember the last lesson).
In this post, we are going to explain something that we have used already in more detail. You already know that to produce output you need to use the function print() from the previous lessons.
How
to use the function print():
You can print a variable by just putting its name in the brackets of the print() function, but if you want to write text as output, you have to write the text inside quotation marks “” inside the brackets.
If you want to combine different elements, you
have to use a comma in between.
If you want to combine strings, you can use a +
plus. In this case, you have to add a blank space before the second string to
create a separation.
Remember:
Capital letters make a difference so never write print() with a capital P.
How
to format the output:
Since there
are so many ways to format your output, I recommend you just search on the
Internet for whatever you need. For now, there are three frequent examples
By default, there is just a blank space between the different elements in a print(). You can replace the blank spaces by commas by adding sep=”,” before closing the bracket of the print function. Of course, you can just modify it by substituting the comma by a point or any other symbol or text you want.
If you want spread your text over multiple lines, you add a backslash followed the letter n (\n) between the words you want to separate.
To shorten the amount of digits displayed for a float number, you put ‘%.2f’% (“apostrophe + % + . + number of digits displayed + f + %”) in front of the variable. Here, the number 2 indicates that you only want two digits, but of course you can modify it. Alternative you can use the function round(), but this affects the value of the variable for future operations, whereas formatting only changes the visual appearance of the output.
To practice your newly acquired knowledge (#mastery05), look at the next lesson on basic user input where there is going to be an exercise that includes both output and input.
The basic data types that are used in Python, when to use which one and why distinguishing them is important.
What do you need (to know)?
Nothing. You don’t even have to read the previous posts on calculations, comments, or the principles of Python. You just need a program that can execute Python code such as Thonny.
Before we get started with practicing, we need a quick introduction to the types of data used in Python. Basically, there are three groups of variables:
a) numeric variables = numbers
without decimals → integer implemented with the function int() [you probably remember them from the previous posts]
with decimals → floating-point numbers implemented with the function float()
b) alphanumeric variables: numbers, letters and other symbols
a single character → not really useful
sequences of character data strings → strings implemented with the function str()
c) variables of Boolean data type: may have one of two values, True or False (Attention: make sure it starts with a capital letter)
The variable type matters because it decides which operations you can execute with your code. Add two numbers, for instance 26 and 9, as strings (a), one as string and the other as integer (b), and both as integers (c). What are the results?
If you add two number that are formatted as strings
(standard option when you get them as an input from a user), you just get the
two numbers combined as a result (a). If you want to get the sum, both numbers
need to be numeric variables, so either integer or float (c). In this case, the
integer type is enough, but you might as well format both as float. What is
important is that the variables you want to do operations with are from the
same group. Otherwise, you will get an error message (b).
Did you notice how I used comments to explain what I am doing and to prevent the code in a) and b) from executing, also to avoid the error message from b)?
Boolean variables are useful to evaluate whether an expression is true or not. You can just use the function bool(), write some expression in brackets and when executing the code, the result will be either True and False. Try it yourself in Python: If a = 4 and b = 5, are the following three expressions true or false?
d) a > 9 e) a < (3+b) f) (90-b) <= a
Did you remember that Python will only display the result if you print it? This means, of course, that you have to save the result in a variable before. Lesson 5 will focus entirely on output, so don’t worry if it is still challenging for you.
A final piece of advice: If you don’t know what type of variable you are using, you can always use the function type() and just write the name of the variable inside the brackets. Python will give you the answer using the term class and indicating Python’s abbreviation of the data type, i.e. the one that you use to define a variable’s type.
Congratulations! You have mastered lesson 4! #mastery04
When learning a programing language, it makes sense to know about its background and its design principles. For Python, you should have a look at the Zen of Python. You can find them either on the Internet or it appears if you run import this (This kind of hidden joke is called “Easter egg”).
I am not going to give you a full explanation of each guideline, as there are many good ones on the Internet, but I am going to mention those who are most relevant for beginners or attention-grabbing.
From my understanding, many of the principles, in particular those 2-7, boil down to one key guideline: “keep it simple, but not at the expense of clarity”. The goal is to write code that can be understood, at a later point in time or by you. This is also the motivation behind comments. The combination of the principles 3. Simple is better than complex. and 4. Complex is better than complicated., shows that their creator was aware that not everything you develop will be easy and thus recommends not to sacrifice understandability for simplicity.
The principles 8. Special cases aren’t special enough to break the rules. and 9. Although practicality beats purity. are equally relevant for beginners and experts. Taken together, they recommend that you should stick to the “best practices” like simplicity and clarity, but again keep in mind that the purpose is improving your program, not following the rules.
The principles 13. There should be one– and preferably only one –obvious way to do it. and 14. Although that way may not be obvious at first unless you’re Dutch. are insider jokes. The first one points to the Perl programming language that prides itself of having many ways of solving the same problem, but this does also create confusion and additional work if you need to learn various possibilities. Python wants to avoid this, but of course there are exceptions. The allusion to being “Dutch” refers to the nationality of the creator of Python, Guido van Rosum.
In my
opinion, knowing all of this gives you a good first idea of what the Zen of
Python is about. Needless to say, if you are interested and as you are getting
more and more involved with programming, I highly recommend to read them all
and, of course, see what other people’s interpretations are.
Finally, you may think that it is kind of random to have 19 design principle and that having 20 would have been much more logical. There are some rumors that the writer of the principles, Tim Peters, wanted to leave the final one to the creator of Python, Guido van Rosum, whereas other sources say it is “some bizarre in-joke”. Whatever may be the truth, fact is that there is no 20th principle written down so far so there is a lot of speculation.
If you want to make a clarification or explain something, you can write a comment in Python. If you start the line with a hashtag # or three apostrophes ‘‘‘, Python knows that this is not part of your code and does not execute it.
What do you need comments for?
Look at this code without any comments.
Do you understand what it is supposed to mean? It is less than 10 lines of code.
Now look at this code with some explanations.
Basically, comments are just supposed to make your life
easier for when you try to understand your code later on and of course for
others who might need to look at your code.
When to use which type of comment?
You may have noticed that Thonny fades out comments started by # and displays comments between ”’ in green (like text). This is not the only difference between them.
#: valid for the rest of the line
advantage: only one symbol necessary
disadvantage: automatically blocks out the rest of the line; if necessary, you need to repeat it in the next line
‘’’ [text] ‘’’: valid until closed
advantage: you determine the start and the end (works in the middle of a line and for multiple lines)
disadvantage: you need three symbols each time (if you forget one, it will not work); you need to close it
In general, I agree with the website Python for Beginners – very useful, by the way – that recommends to think “of the first type as a comment for yourself, and the second as a comment for others”.
So from now on, just add comments to your code whenever necessary! #mastery02
How to create a Python3 program that asks the user for two integer values and does some simple calculations with it (sum, difference, product, division).
What do you need to know beforehand?
Nothing. However, you do need to install a tool if you want to run the program, for instance Thonny (free, self-explanatory download and easy to use).
2 pieces of advice before we start:
Write your code (= the instructions) step by step and try it out by running it (press F5).
If there is an error, check brackets, quotation marks etc. and use Thonny’s assistant function (appears automatically). The debugger even points out the exact location of the error with a small ^ below it.
0.
Install your tool (e.g. Thonny) and open it.
The larger empty
field, where the cursor is, is called the editor where you can write
instructions. The smaller empty field below is the console where you can see
the result if you execute your instructions using F5.
1. Ask
the user for an integer value, which is a number without any decimal points
etc.
In the editor: We define a variable in which we store the number we get it: We choose a name, meaningful at best, like number1, and tell Thonny that we want to define it by using =. With the function input(), we set our variable equal to whatever is written into the console. Inside the brackets (), we can write an explanation for the user what he/she should write, but it needs to be in quotation marks.
In the
console: Press F5 and you will be asked to type in a number. Do it.
If you want to see your result, you write the function print() in the editor and put your variable’s name in the brackets (). If you press F5, your number will appear in the console.
2. Ask the user for another integer value.
Repeat the
process from 1. Unless you type in the first number required, you will not see
any difference in the console. I use the example of 24 and 789 here.
You
may notice that every time you press F5, the console runs the code (= your
instructions) from the beginning.
3. Use
those two values to make some calculations.
So far, we have only saved the integer values as the data type string (= text). Before we can do calculations, we need to change both variables by adding the function int() around each definition. This converts each one to an integer (= number) that we can use to make calculations.
a)
Calculate the sum of the two numbers.
Just write
the names of the two variables with a +, but put each name inside the function
int(). This is necessary so Thonny knows that it is supposed to work with
integers (= numbers) and not strings (text).
Don’t
forget: If you want to see the result, you need to use the function print(),
either putting it around everything or defining an additional variable as the
sum and printing this one.
You can add
a description such as “sum: “ beforehand if you want to, but remember to put it
in quotation marks and you are going to have to add a comma to separate it from
the calculation.
b)
Calculate the difference of the two numbers.
Do the same
as in a), but exchange the + for a -.
c) Calculate the product of the two numbers.
Do the same
as in a), but exchange the + for a *.
d) Calculate the integer-based division of the two numbers (so no decimal point).
Do the same
as in a), but exchange the + for a /.
e) Calculate the remainder of integer division of the two numbers (= what remains when you do the division because you cannot fit the second number anymore into the first one).
Do the same
as in a), but exchange the + for a %.
YOU MADE IT! If you want a more complete approach to learning Python (including all the theory), you can have a look at the free pdf version of Think Python by Allen B. Downey.
Did I keep my promise of keeping it short and simple? If you have any questions or comments, just let me know. #mastery01